
In today's digital landscape, video content is king. However, delivering high-quality video content across multiple devices and network conditions requires transcoding videos into various resolutions and formats. This can be a computationally intensive task, especially when dealing with large volumes of video files. To address this challenge, we will build a scalable and robust video transcoding service leveraging AWS's powerful cloud infrastructure.
This tutorial will guide you through creating a video transcoding service using the following technologies:
Amazon S3 for storing video files
Amazon ECS and Docker for scalable container orchestration
FFmpeg for video processing
Redis for real-time logging
SocketIO and Next.js for real-time updates and a user-friendly interface
By the end of this tutorial, you will have a fully functioning video transcoding service capable of handling video uploads, transcoding videos into multiple resolutions, and storing the processed files back in S3. Additionally, the service will be scalable, leveraging Docker containers managed by AWS ECS, ensuring that it can handle a large number of video files efficiently.
Key Components
Amazon S3 Bucket Setup
Setting up an S3 bucket to store raw and processed video files.
Configuring permissions and CORS for seamless file access.
Docker Container for Video Transcoding
Creating a Docker container that uses FFmpeg to transcode videos into multiple resolutions.
Implementing a script to handle downloading, processing, and uploading video files.
Handling Logs with Redis
Setting up a Redis pub/sub system to manage real-time logs from the Docker container.
Deploying with Amazon ECS
Building and pushing Docker images to Amazon ECR.
Setting up ECS to orchestrate and scale our Docker containers.
Real-Time Updates with SocketIO and Next.js
Implementing a user interface to monitor the transcoding process in real-time.
Prerequisites
Before you begin, ensure you have the following:
An AWS account with permissions to create and manage S3, ECS, ECR, and IAM resources.
Basic knowledge of Docker and containerization.
Familiarity with Node.js and JavaScript.
Part 0 : S3 Bucket setup
To begin, we need to set up an Amazon S3 bucket where we will upload all the files for our video transcoding service.
Step 1: Create a New S3 Bucket
Access the AWS Management Console:
Log in to your AWS account and navigate to the AWS Management Console.
Navigate to S3:
In the AWS Management Console, search for and select "S3" to open the Amazon S3 dashboard.
Create a New Bucket:
Click on the "Create bucket" button to start the bucket creation process.
Enter a unique name for your bucket. Remember that bucket names must be globally unique across all existing bucket names in Amazon S3.
Choose the appropriate AWS Region for your bucket. Selecting a region close to your primary users can help reduce latency.
Step 2: Configure Bucket Permissions
Adjust Public Access Settings:
In the "Block Public Access settings for this bucket" section, turn off "Block all public access." This setting allows the bucket to be publicly accessible.
Acknowledge the warning about making your bucket public and confirm your choice.
Set Up Bucket Policy for Public Access:
After creating the bucket, navigate to the "Permissions" tab of your bucket.
Under "Bucket policy," click on "Edit" to add a new policy.
Use the following JSON policy to grant public read access to all objects in the bucket:
{
    "Version": "2012-10-17",
    "Statement": [
        {
            "Sid": "Statement1",
            "Effect": "Allow",
            "Principal": "*",
            "Action": "s3:GetObject",
            "Resource": "arn:aws:s3:::video-transcoder.hardikjain.tech/*"
        }
    ]
}
Step 3: Set Up Cross-Origin Resource Sharing (CORS)
To avoid CORS (Cross-Origin Resource Sharing) errors when accessing your S3 bucket from a different domain, you need to configure CORS settings for your bucket.
Navigate to the CORS Configuration:
In the S3 console, go to the "Permissions" tab of your bucket.
Scroll down to the "Cross-origin resource sharing (CORS)" section and click "Edit."
Add CORS Configuration:
Add the following CORS configuration in the text area:
[
    {
        "AllowedHeaders": [
            "*"
        ],
        "AllowedMethods": [
            "GET",
            "HEAD",
            "PUT",
            "POST",
            "DELETE"
        ],
        "AllowedOrigins": [
            "*"
        ],
        "ExposeHeaders": [
            "ETag",
            "x-amz-meta-custom-header"
        ],
        "MaxAgeSeconds": 3000
    }
]
Part 1: Docker Container for Transcoding Videos
Step 1: Set Up FFmpeg Script to Transcode Videos
The first step is to download a video file that was previously uploaded to S3 and transcode it into multiple resolutions.
Create a script named transcoder.sh
S3_REGION="${S3_REGION}"
S3_BUCKET_NAME="${S3_BUCKET_NAME}"
VIDEO_ID="${VIDEO_ID}"
FILENAME="${FILENAME}"

input="${FILENAME}"

echo "Downloading file from S3"

s3_url="https://s3.${S3_REGION}.amazonaws.com/${S3_BUCKET_NAME}/__raw_uploads/${VIDEO_ID}/${input}"

curl -O "$s3_url"

output_dir="hls_video_output"
mkdir -p $output_dir

segment_time=10

echo "Transcoding 1080p video"

ffmpeg -i $input -vf "scale=w=1920:h=1080" -c:a aac -strict -2 -c:v h264 -hls_time $segment_time -hls_playlist_type vod -hls_segment_filename "$output_dir/1080p_%03d.ts" "$output_dir/1080p.m3u8"

echo "Transcoding 720p video"

ffmpeg -i $input -vf "scale=w=1280:h=720" -c:a aac -strict -2 -c:v h264 -hls_time $segment_time -hls_playlist_type vod -hls_segment_filename "$output_dir/720p_%03d.ts" "$output_dir/720p.m3u8"

echo "Transcoding 480p video"

ffmpeg -i $input -vf "scale=w=854:h=480" -c:a aac -strict -2 -c:v h264 -hls_time $segment_time -hls_playlist_type vod -hls_segment_filename "$output_dir/480p_%03d.ts" "$output_dir/480p.m3u8"

cat << EOF > $output_dir/master.m3u8
#EXTM3U
#EXT-X-STREAM-INF:BANDWIDTH=8000000,RESOLUTION=1920x1080
1080p.m3u8
#EXT-X-STREAM-INF:BANDWIDTH=4000000,RESOLUTION=1280x720
720p.m3u8
#EXT-X-STREAM-INF:BANDWIDTH=2000000,RESOLUTION=854x480
480p.m3u8
EOF
The above bash script downloads a file from S3 Bucket, and use FFMPEG to generate different resolutions segments of the video in the output directory.
Step 2: Javascript program to handle file uploads back to S3
The script is called from the javascript uploader.js file, which runs the bash script, and then uses S3 Client v3 sdk to upload the output files back to another output directory in S3 Bucket.
const p = exec("bash transcoder.sh");

  p.stdout.on('data', function (data) {
    publishLog(data.toString());
  })

  p.stdout.on('error', function (data) {
    publishLog(`Error : ${data.toString()}`);
    publishUpdate('FAILED')
  })

  p.on('close', async function () {
    publishLog("Completed Transcoding");
    // Code to upload files back to S3
})
}
To handle uploading back to S3, we use S3 Client
const s3Client = new S3Client({
  region: process.env.S3_REGION,
  credentials: {
    accessKeyId: process.env.S3_ACCESS_KEY_ID,
    secretAccessKey: process.env.S3_SECRET_ACCESS_KEY
  }
})
const hlsFolderContents = fs.readdirSync(directory_path, {
recursive: true
});
for (const file of hlsFolderContents) {
const filePath = path.join(directory_path, file);
if (fs.lstatSync(filePath).isDirectory()) continue;
const command = new PutObjectCommand({
Bucket: process.env.S3_BUCKET_NAME,
Key: `__hls_video_output/${VIDEO_ID}/${file}`,
Body: fs.createReadStream(filePath),
ContentType: mime.lookup(filePath)
});
await s3Client.send(command);
}Step 3: Handle logs from docker container
We use redis pub/sub architecture to publish logs from the docker container to our backend, as we would not be able to access logs from docker container
const publisher = new Redis(process.env.REDIS_URL);
const VIDEO_ID = process.env.VIDEO_ID
function publishLog(log) {
  console.log(log);
  publisher.publish(`logs:${VIDEO_ID}`, JSON.stringify({ log }))
}

function publishUpdate(status) {
  console.log(status);
  publisher.publish(`job-updates`, JSON.stringify({ videoId: VIDEO_ID, status: status }))
}

// Inside the init function
publishLog("Completed Transcoding");
publishLog("Starting file upload");

// After all files are uploaded
publishUpdate('COMPLETED')
publisher.quit();
Step 4: Wrapping it up
We use Docker to contanerize the current app and will later use AWS ECR and ECS to spin up this containers from the backend
FROM ubuntu:focal

RUN apt-get update
RUN apt-get install -y curl
RUN curl -sL https://deb.nodesource.com/setup_20.x | bash -
RUN apt-get upgrade -y
RUN apt-get install nodejs -y
RUN apt-get install -y ffmpeg

WORKDIR /home/app

COPY transcoder.sh transcoder.sh
COPY uploader.js uploader.js
COPY package*.json .

RUN npm install

RUN chmod +x transcoder.sh
RUN chmod +x uploader.js

CMD [ "node", "/home/app/uploader.js" ]
This script sets up the required packages inside the docker ubuntu image, nodejs, ffmpeg and curl
We copy the required scripts to the working directory of our app, and run the nodejs script which also runs the bash script, handle uploads, and also publish logs using redis.
Step 5 : Building our container image and publishing to ECR
Go to ECR and create a new repository with the default configuration
ECR gives us all the commands we will need to push the container to repository
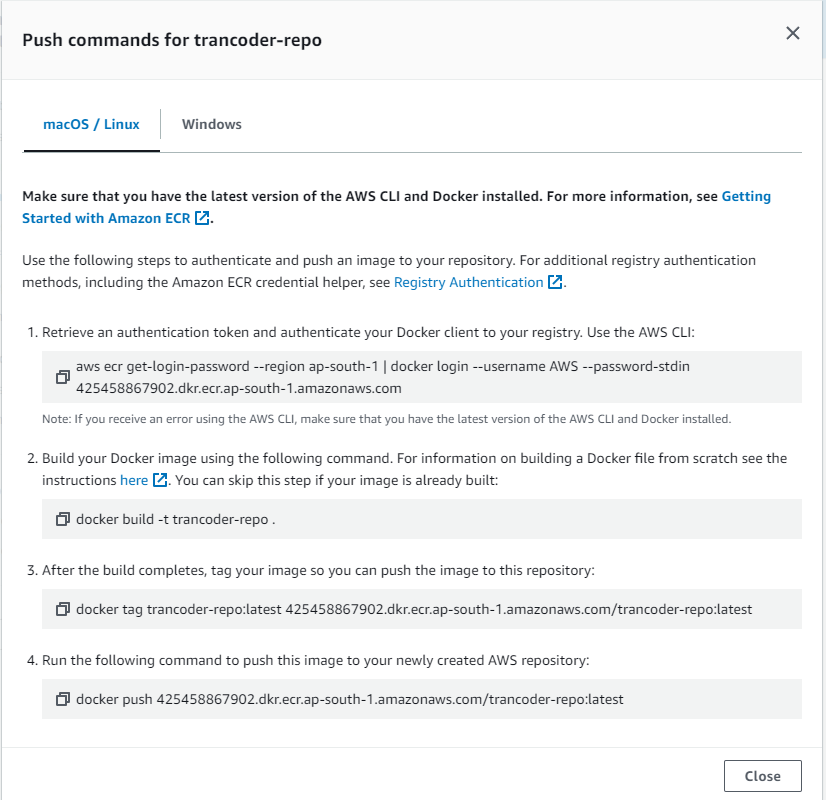
We need to create an user in IAM with the required permissions for all our future tasks also, which are S3 access, ECR and ECS access
Generate the credentials from IAM and store them safely, we will use them as our credentials for both our backend and above docker container, and also from our terminal to push the image to the repository
export AWS_ACCESS_KEY_ID=AKIAIOSFODNN7EXAMPLE
export AWS_SECRET_ACCESS_KEY=wJalrXUtnFEMI/K7MDENG/bPxRfiCYEXAMPLEKEY
Use above commands to set AWS credentials in ubuntu bash terminal, and then use the 4 commands from ECR to push the repository to ECR
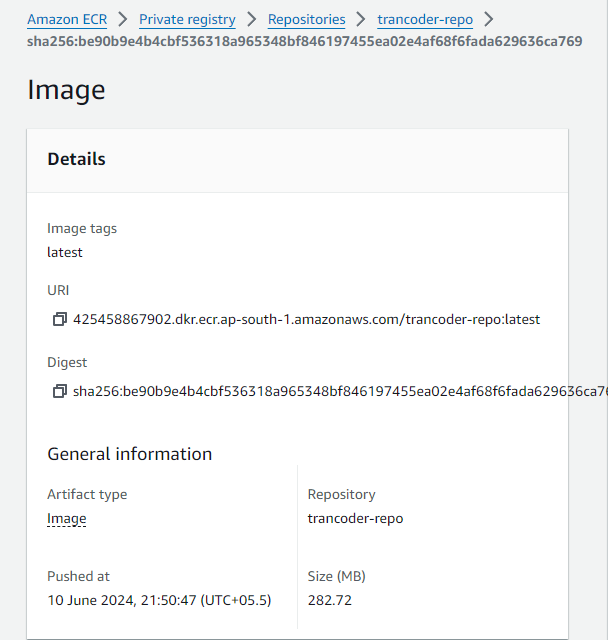
Copy and save the image uri, as we will need it for the next step
We have now successfully build the docker image and pushed it to ECR, now we setup a cluster in ECS and a task defination which we will run inside the cluster
Go to ECS Portal > Task Defiitions > Create new Task definition
Give the task a name, select AWS Fargate and Linux x86 as the infrastructure requirements
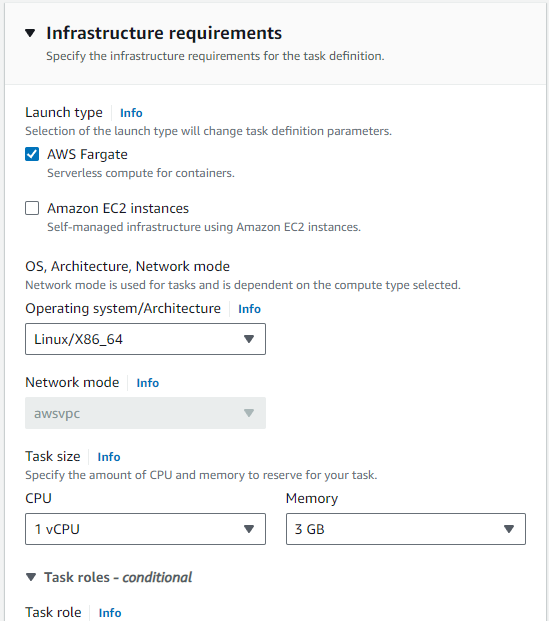
Select 4 as vCPU and 8 GB memory, as we will be doing video processing in this container, we would need a good setup
Now in the next section, container, give your container a name, and paste the image uri from previous step here, and leave everything else as it is and create the task.
Now head back to ECS, create a new cluster with default configuration and then open it, go to tasks tab, and run new task
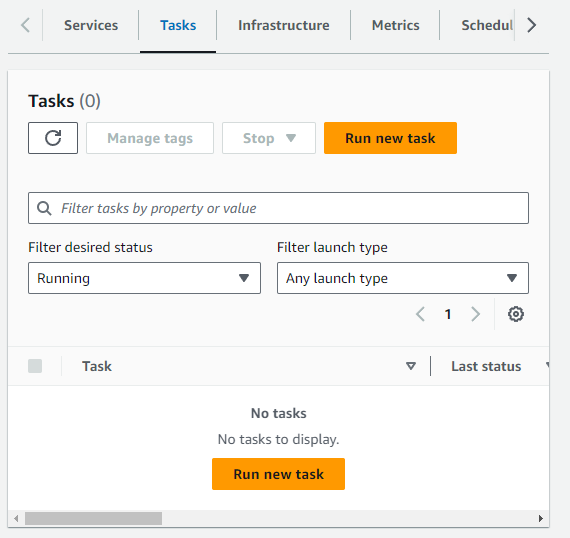
Select application type as task, and select the created task from task definition family,
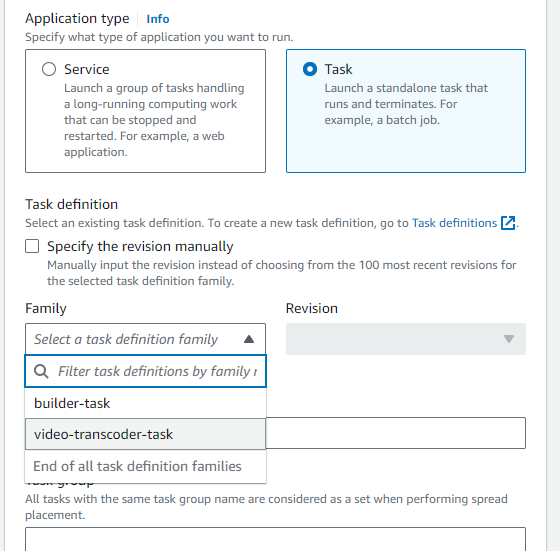
From the networking tab, copy the subnets and security group as we will need them when we need to spin the containers from within our backend API.

Now in the container overrides we will need to setup the environment variables that are required by our container, we will see how to get these parameters later on, the S3 environment variables are obvious, redis url is used for the pub/sub architecture, filename and videoid are used by the container to download and upload the correct video files
{ name: "FILENAME", value: jobParameters.fileName },
{ name: "REDIS_URL", value: process.env.REDIS_URL },
{ name: "S3_ACCESS_KEY_ID", value: AWS_ACCESS_KEY_ID },
{ name: "S3_BUCKET_NAME", value: process.env.S3_BUCKET_NAME_N },
{ name: "S3_REGION", value: process.env.S3_BUCKET_REGION_N },
{ name: "S3_SECRET_ACCESS_KEY", value: SECRET_ACCESS_KEY },
{ name: "VIDEO_ID", value: jobParameters.videoId }
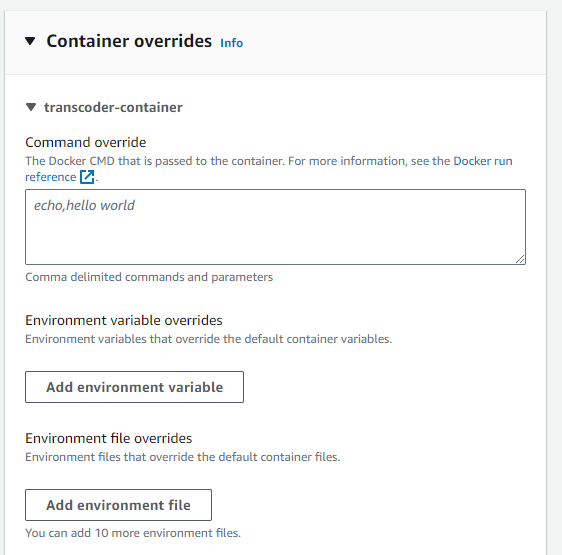
Now after this we can successfully launch the task, and the container would run and the first part of the service is done.
Part 2 : Backend API for managing requests
Step 1 : Setup Express Typescript project
Install necessary packages in the express app
npm i express cors dotenv ioredis @prisma/client socket.io typescript zod @aws-sdk/client-ecs @aws-sdk/client-s3 @aws-sdk/s3-request-presigner prisma nodemon ts-nodeWe will setup typescript and nodemon in the project
package.json
{
  "name": "api",
  "version": "1.0.0",
  "main": "index.js",
  "scripts": {
    "start": "tsc && node dist/index.js",
    "dev": "nodemon - exec 'ts-node' src/index.ts"
  },
  "keywords": [],
  "author": "",
  "license": "ISC",
  "description": "",
  "dependencies": {
    "@aws-sdk/client-ecs": "^3.592.0",
    "@aws-sdk/client-s3": "^3.592.0",
    "@aws-sdk/s3-request-presigner": "^3.592.0",
    "@prisma/client": "^5.15.0",
    "cors": "^2.8.5",
    "dotenv": "^16.4.5",
    "express": "^4.19.2",
    "ioredis": "^5.4.1",
    "socket.io": "^4.7.5",
    "typescript": "^5.4.5",
    "zod": "^3.23.8"
  },
  "devDependencies": {
    "@types/express": "^4.17.21",
    "nodemon": "^3.1.3",
    "prisma": "^5.15.0",
    "ts-node": "^10.9.2"
  }
}
tsconfig.json
{
  "compilerOptions": {
    "module": "commonjs",
    "esModuleInterop": true,
    "target": "es2021",
    "moduleResolution": "node",
    "sourceMap": true,
    "outDir": "dist"
  },
  "lib": [
    "es2021"
  ]
}
nodemon.json
{
  "watch": [ "src" ],
  "ext": "ts",
  "exec": "ts-node ./src/index.ts"
}
Step 2 : Setup database and prisma client
Now that we have a working project, we can go to src/index.ts and start writing the main code
But before that we need to setup prisma, run npx prisma init to initialise the prisma client, and setup our database schema
We are using postgresql database for storing data in a relational database, and using prisma client to manage requests
enum videoStatus {
  INITIAL
  UPLOADING
  QUEUED
  PROCESSING
  COMPLETED
  FAILED
}

model video {
  id          String      @id @default(uuid())
  title       String
  status      videoStatus @default(INITIAL)
  rawFileName String      @map("raw_file_name")
}
Step 3 : Setup express app routes
Now in index.ts, start by adding default express app with json and cors middlewares, and attach it to a http server
dotenv.config()

const app = express();
app.use(cors());
app.use(express.json());

const PORT: number = parseInt(process.env.PORT || "9000");
const httpServer = http.createServer(app);

app.get('/', (req, res) => {
  return res.json({ message: "API running successfully" })
});

httpServer.listen(PORT, () => {
  console.log(`Server socket running on ${PORT}`)
});
The app should now be running and listening on the required port
Now we can create a router and start writing our routes
const createVideoSchema = z.object({
  title: z.string(),
  content_type: z.string(),
  fileName: z.string()
});

const getUploadPartUrlSchema = z.object({
  Key: z.string(),
  UploadId: z.string(),
  PartNumbers: z.array(z.number()),
  videoId: z.string(),
});


const completeMultipartUploadSchema = z.object({
  Key: z.string(),
  UploadId: z.string(),
  Parts: z.array(z.object({
    ETag: z.string(),
    PartNumber: z.number()
  })),
  videoId: z.string(),
});

const validate = (schema: z.AnyZodObject) => (req, res, next) => {
  const validation = schema.safeParse(req.body);
  if (!validation.success) {
    return res.status(400).json(validation.error);
  }
  next();
};


const AWS_ACCESS_KEY_ID = process.env.AWS_ACCESS_KEY_ID_N || "";
const SECRET_ACCESS_KEY = process.env.AWS_SECRET_ACCESS_KEY_N || "";

const config = {
  CLUSTER: 'arn:aws:ecs:ap-south-1:425458867902:cluster/VideoTranscoderCluster',
  TASK: 'arn:aws:ecs:ap-south-1:425458867902:task-definition/video-transcoder-task:3'
}

const prisma = new PrismaClient({})

const s3Client = new S3Client({
  region: process.env.S3_BUCKET_REGION_N,
  credentials: {
    accessKeyId: AWS_ACCESS_KEY_ID,
    secretAccessKey: SECRET_ACCESS_KEY
  }
});

const ecsClient = new ECSClient({
  region: 'ap-south-1',
  credentials: {
    accessKeyId: AWS_ACCESS_KEY_ID,
    secretAccessKey: SECRET_ACCESS_KEY
  }
})
router.post('/video', validate(createVideoSchema), async (req, res) => {
try {
const { title, content_type, fileName } = req.body;
const video = await prisma.video.create({
data: {
title: title,
rawFileName: fileName
}
});
const video_id = video.id;
const multipart_upload_command = new CreateMultipartUploadCommand({
Bucket: process.env.S3_BUCKET_NAME_N,
Key: `__raw_uploads/${video_id}/${fileName}`,
ContentType: content_type
});
const multipart_response = await s3Client.send(multipart_upload_command);
const { UploadId, Key, Bucket } = multipart_response;
return res.json({ UploadId, Key, Bucket, video_id });
} catch (error) {
return res.status(500).json({ error: error.message });
}
});This first route will create a new video in the database, and create a multipart upload request on which we can upload our file
router.post('/get-upload-part-urls', validate(getUploadPartUrlSchema), async (req, res) => {

  const { Key, UploadId, PartNumbers, videoId } = req.body;

  try {
    await sendStatusUpdate(videoId, "UPLOADING");
    const signedUrls = await Promise.all(PartNumbers.map(async (PartNumber) => {
      const uploadPartCommand = new UploadPartCommand({
        Bucket: process.env.S3_BUCKET_NAME_N,
        Key,
        UploadId,
        PartNumber
      });
      const signedUrl = await getSignedUrl(s3Client, uploadPartCommand, { expiresIn: 3600 });
      return { PartNumber, signedUrl };
    }));

    res.json({ signedUrls });
  } catch (error) {
    res.status(500).json({ error: error.message });
  }
});
The second route recieves the required parts from the frontend, and generate the signed urls for all the parts of the video
router.post('/complete-multipart-upload', validate(completeMultipartUploadSchema), async (req, res) => {
  const { Key, UploadId, Parts, videoId } = req.body;
  const completeMultipartUploadCommand = new CompleteMultipartUploadCommand({
    Bucket: process.env.S3_BUCKET_NAME_N,
    Key,
    UploadId,
    MultipartUpload: {
      Parts
    }
  });
  try {
    await s3Client.send(completeMultipartUploadCommand);
    const updatedVideo = await sendStatusUpdate(videoId, "QUEUED");
    const jobParameters: TranscodeJobParameters = {
      fileName: updatedVideo.rawFileName,
      videoId: updatedVideo.id
    }
    const command = new RunTaskCommand({
      cluster: config.CLUSTER,
      taskDefinition: config.TASK,
      launchType: 'FARGATE',
      count: 1,
      networkConfiguration: {
        awsvpcConfiguration: {
          assignPublicIp: 'ENABLED',
          subnets: ['subnet-xxxxx', 'subnet-xxxxx', 'subnet-xxxxx'],
          securityGroups: ['sg-xxxxx']
        }
      },
      overrides: {
        containerOverrides: [
          {
            name: 'transcoder-container', environment: [
              { name: "FILENAME", value: jobParameters.fileName },
              { name: "REDIS_URL", value: process.env.REDIS_URL },
              { name: "S3_ACCESS_KEY_ID", value: AWS_ACCESS_KEY_ID },
              { name: "S3_BUCKET_NAME", value: process.env.S3_BUCKET_NAME_N },
              { name: "S3_REGION", value: process.env.S3_BUCKET_REGION_N },
              { name: "S3_SECRET_ACCESS_KEY", value: SECRET_ACCESS_KEY },
              { name: "VIDEO_ID", value: jobParameters.videoId }
            ]
          }
        ]
      }
    });
    await ecsClient.send(command);
    return res.json({ message: "Added to queue" });
  } catch (error) {
    res.status(500).json({ error: error.message });
  }
});
This route will be called after uploading the video parts to S3 and will call ecs client to run the transcoder service
Step 4 : Setup logging and socket io for sending logs to frontend
const logSubscriber = new Redis(process.env.REDIS_URL || "");
const jobStatusSubscriber = new Redis(process.env.REDIS_URL || "");

const io = new Server(httpServer, {
  cors: {
    origin: '*',
    methods: ["GET", "POST"]
  }
});

export const sendStatusUpdate = async (videoId: string, status: videoStatus) => {
  console.log(`${videoId}: ${status}`)
  const updatedVideo = await prisma.video.update({
    where: { id: videoId },
    data: { status: status }
  })
  io.to(`logs:${videoId}`).emit('message', JSON.stringify({
    type: 'status-update',
    status: status
  }))
  return updatedVideo
}

const sendLogMessage = async (videoId: string, message: string) => {
  console.log(`${videoId}: ${message}`)
  io.to(`logs:${videoId}`).emit('message', JSON.stringify({
    type: 'log-message',
    message: message
  }));
}


io.on('connection', (socket) => {
  socket.on('subscribe', (channel) => {
    console.log(`${socket.id} subscribe to ${channel}`)
    socket.join(channel);
  });
});


async function initRedis() {
  logSubscriber.psubscribe('logs:*');
  logSubscriber.on('pmessage', (pattern, channel, message) => {
    const { log } = JSON.parse(message);
    sendLogMessage(channel.split(":")[1], log);
  });
  jobStatusSubscriber.subscribe('job-updates');
  jobStatusSubscriber.on('message', async (channel, message) => {
    const { videoId, status } = JSON.parse(message);
    if (status === 'PROCESSING' || status === 'FAILED' || status === 'COMPLETED') {
      sendStatusUpdate(videoId, status);
    }
  })
};

initRedis();
Now we have setup everything in the backend api, now the last part remaining is the frontend code
"use client"

import { createContext, useCallback, useContext, useEffect, useState } from "react"
import { Socket, io } from "socket.io-client"
import { hostName } from "./page"

export type IOContext = {
  startSocket: (videoId: string) => void;
  stopSocket: () => void;
  status: string,
  messages: string[],
  setStatus: (status: string) => void;
}

const IOContext = createContext<IOContext | null>(null)
export const IOContextProvider = ({ children }: {
  children: React.ReactNode
}) => {
  const [socket, setSocket] = useState<Socket | null>(null);
  const [messages, setMessages] = useState<string[]>([]);
  const [status, setStatus] = useState("");

  const onMessageReceived = useCallback((msg: string) => {
    try {
      console.log(msg)
      const { type, status, message } = JSON.parse(msg);
      if (type === 'log-message' && message) {
        setMessages([...messages, message])
        console.log(messages);
      } else if (type === 'status-update' && status) {
        setStatus(status)
      }
    } catch (error) {

    }
  }, [messages])

  const startSocket = (videoId: string) => {
    const _socket = io(hostName);
    setSocket(_socket);
    setMessages([]);
    setStatus("");
    _socket.emit("subscribe", `logs:${videoId}`)
    _socket.on('message', onMessageReceived)
  }

  const stopSocket = () => {
    socket?.disconnect();
    socket?.off('message', onMessageReceived)
    setSocket(null);
  }

  return (
    <IOContext.Provider value={
      {
        startSocket, stopSocket, status, messages, setStatus
      }
    }>
      {children}
    </IOContext.Provider>
  )
}

export const useIOContext = () => {
  const state = useContext(IOContext);
  if (!state) throw new Error("state not defined");
  return state;
}
"use client";

import axios from "axios";
import { FormEvent, useEffect, useState } from "react";
import { IOContext, IOContextProvider, useIOContext } from "./IOContext";
import Link from "next/link";

type UploadInfo = {
  UploadId: string;
  Key: string;
  Bucket: string;
  video_id: string
}

export const hostName: string = "http://localhost:9001";

export default function Home() {
  const [file, setFile] = useState<File | null>(null);
  const [title, setTitle] = useState("");

  const [videos, setVideos] = useState<any[]>([]);

  const context: IOContext = useIOContext();

  const onSubmit = async (e: FormEvent<HTMLFormElement>) => {
    e.preventDefault();
    if (!file || title.length === 0) {
      return;
    }
    try {
      const response = await axios.post(`${hostName}/video`, {
        title: title,
        fileName: file.name,
        content_type: file.type
      });
      context.startSocket(response.data.video_id);
      const chunkSize = 5 * 1024 * 1024;
      const chunks = [];
      const partNumbers = [];
      let partNumber = 1;
      for (let start = 0; start < file.size; start += chunkSize) {
        const end = Math.min(start + chunkSize, file.size);
        const chunk = file.slice(start, end);
        chunks.push(chunk);
        partNumbers.push(partNumber);
        partNumber++;
      }
      const signedUrls = await axios.post(`${hostName}/get-upload-part-urls`, {
        Key: response.data.Key,
        UploadId: response.data.UploadId,
        videoId: response.data.video_id,
        PartNumbers: partNumbers
      });
      const uploadPromises = chunks.map((chunk, index) => {
        const { signedUrl, PartNumber } = signedUrls.data.signedUrls[index];
        return axios.put(signedUrl, chunk, {
          headers: {
            'Content-Type': file.type
          }
        }).then(uploadResponse => ({
          ETag: uploadResponse.headers.etag,
          PartNumber: PartNumber
        }));
      });
      const uploadParts = await Promise.all(uploadPromises);
      await axios.post(`${hostName}/complete-multipart-upload`, {
        Key: response.data.Key,
        UploadId: response.data.UploadId,
        Parts: uploadParts,
        videoId: response.data.video_id
      });
    } catch (error) {
      console.log(error);
    }
  }

  useEffect(() => {
    const getVideos = async () => {
      try {
        const response = await axios.get(`${hostName}/videos`);
        console.log(response.data);
        setVideos(response.data);
      } catch (error) {
        console.log(error);
      }
    }
    getVideos();
  }, [])

  return (
    <main className="flex min-h-screen flex-col items-center gap-8 p-24">
      {
        videos.map((video, index) => (
          <div key={index}>
            <Link href={`/${video.id}`}>
              {video.title}
            </Link>
          </div>
        ))
      }
      <h1 className="text-2xl">Video Transcoding Service</h1>
      <form className="flex flex-col gap-8 items-center" onSubmit={onSubmit}>
        <div className="w-full flex justify-between">
          <label htmlFor="file">Video File</label>
          <input type="file" id="file" onChange={(e) => {
            if (e.target.files && e.target.files.length > 0) {
              setFile(e.target.files[0]);
            }
          }} />
        </div>
        <div className="w-full flex justify-between">
          <label htmlFor="title">Video Title</label>
          <input type="text" id="title" value={title} onChange={(e) => setTitle(e.target.value)} />
        </div>
        <div className="w-full flex justify-between">
          <button type="submit">
            Upload
          </button>
        </div>
      </form>
      <div>
        {context.status}
        <ul>
          {context.messages.map((message, index) => (
            <li key={index}>{message}</li>
          ))}
        </ul>
      </div>
    </main>
  );
}
Check the github repositories at:
jainhardik120/Video_Transcoder_API: Backend Express API for Video Transcoder Service